
PHP is still one of the most widely used programming languages for web development in 2026. Many developers use PHP frameworks to build applications faster and keep their code organized. One of the most popular lightweight frameworks is CodeIgniter.
CodeIgniter is known for its simple structure, fast performance, and easy learning curve. It follows the MVC (Model-View-Controller) architecture, which helps developers organize code properly. Because of this, CodeIgniter is widely used for building dynamic websites, admin panels, APIs, and business applications.
If you are starting with PHP frameworks, CodeIgniter 4 is a good choice. In this tutorial, you will learn how to install CodeIgniter 4 step by step on your local computer.
Table of Contents
What is CodeIgniter 4?
CodeIgniter 4 is the latest version of the CodeIgniter framework. It is built with modern PHP standards and includes many improvements compared to older versions.
- Lightweight and fast framework
- Easy to install and configure
- Follows MVC architecture
- Good documentation
- Built-in security features
- Composer support
Because of these features, many developers use CodeIgniter for small and medium web applications.
Requirements Before Installing CodeIgniter 4
Before installing CodeIgniter 4, make sure your system meets the basic requirements.
- PHP version 8.1 or higher
- Web server such as Apache or Nginx
- Composer installed on your system
- XAMPP, WAMP, or similar local server environment
If you are using XAMPP, make sure Apache and MySQL services are running before starting the installation.
Methods to Install CodeIgniter 4
There are two common ways to install CodeIgniter 4 on your system.
- Manual installation by downloading the framework
- Installation using Composer
Both methods work, but Composer installation is recommended because it automatically installs required packages and dependencies.
Method 1: Manual Installation of CodeIgniter 4
The first method is downloading the framework manually from the official website.
Visit the official website:
Download the latest version of CodeIgniter 4. After downloading the ZIP file, extract it on your computer.
If you are using XAMPP, move the extracted folder into the following directory:
C:\xampp\htdocsYou can rename the project folder to anything you like. For example:
my_ci4_projectRunning the Development Server
After placing the folder inside the htdocs directory, open Command Prompt and navigate to the project directory.
cd C:\xampp\htdocs\my_ci4_projectNow run the following command to start the CodeIgniter development server.
php spark serveThis command will start the local development server. You will see an address similar to this:
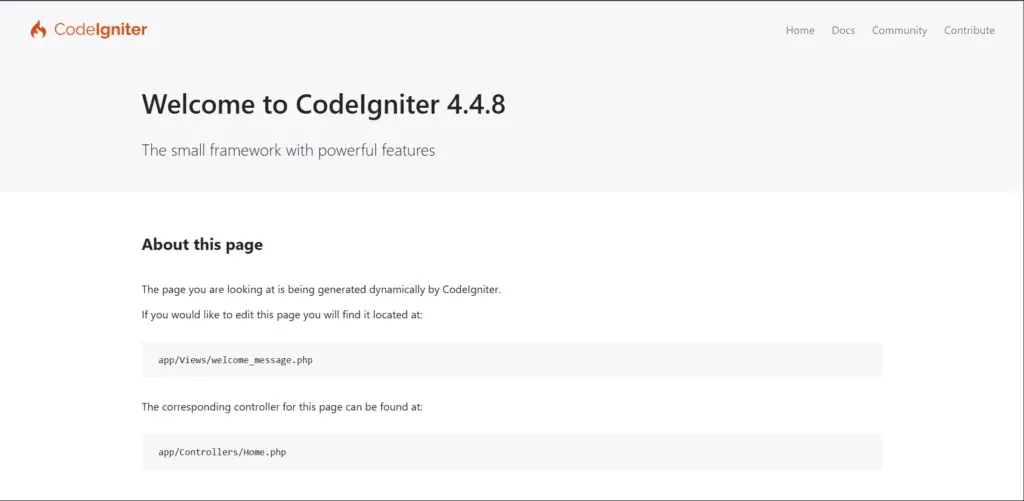
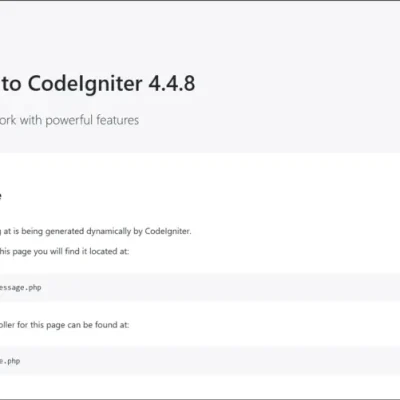
http://localhost:8080Open this address in your browser. If the installation is successful, the CodeIgniter welcome page will appear.
Method 2: Install CodeIgniter 4 Using Composer
The second method uses Composer. This is the recommended way because it automatically installs all required dependencies.
Step 1: Download Composer
Go to the official Composer website:
Download the Windows installer file.
Composer-Setup.exeStep 2: Install Composer
Run the installer and follow the setup wizard. During installation, Composer may ask you to select the PHP executable file.
If you are using XAMPP, choose the following path:
C:\xampp\php\php.exeComplete the installation process.
Step 3: Verify Composer Installation
Open Command Prompt and run the following command:
composer --versionIf Composer is installed correctly, the version number will appear on the screen.
Step 4: Create a CodeIgniter 4 Project
Navigate to the htdocs folder.
cd C:\xampp\htdocsNow create a new CodeIgniter project using the following command.
composer create-project codeigniter4/appstarter my_ci4_projectComposer will download the framework and create the project folder automatically.
Step 5: Run the Project
Move into the project directory.
cd my_ci4_projectStart the development server.
php spark serveOpen your browser and visit:
http://localhost:8080You should now see the CodeIgniter welcome page.
Conclusion
In this tutorial, you learned how to install CodeIgniter 4 using two different methods. Manual installation is simple, but using Composer is the recommended approach because it manages dependencies automatically and keeps the framework updated.
After installing CodeIgniter 4, you can start building web applications, APIs, and dynamic websites using the MVC structure. Learning CodeIgniter is a good step for developers who want to improve their PHP development skills.


1 Comment
Everything is very open with a precise explanation of the challenges.
It was definitely informative. Your website is very helpful.
Thanks for sharing!